Categories
Code

Step 6: Add Logging

When you first start programming in any language, you’re often taught to print() to the console in order to see the values of variables or just to help you debug.

As a beginner, this is an acceptable technique. As you advance in your programming career, you find out sooner or later, that print()-ing to the console to debug is easy, but comes with a lot of drawbacks. But what else should you do?

Use the debugger and use the Logging module instead.

Python created “PEP-282 — A Logging System” back in February 2002! https://www.python.org/dev/peps/pep-0282/

It was inspired by other logging packages of other languages. Logging is a little bit more complex than print(), but it is much better suited to debugging your program than print().

Categories
Code

Step 5: Creating a new Response model

In our last chapter, we talked about properly catching exceptions and re-raising with a custom exception in our _do method:

def _do(self, http_method: str, endpoint: str, ep_params: Dict = None, data: Dict = None):
    full_url = self.url + endpoint
    headers = {'x-api-key': self._api_key}
    try:
        response = requests.request(method=http_method, url=full_url, verify=self._ssl_verify, 
                                    headers=headers, params=ep_params, json=data)
    except requests.exceptions.RequestException as e:
        raise TheCatApiException("Request failed") from e
    data_out = response.json()
    if response.status_code >= 200 and response.status_code <= 299:     # 200 to 299 is OK
        return data_out
    raise Exception(data_out["message"])

In this chapter, we’re going to refactor our code again to make what _do returns more generic and more useful to any code that consumes it.

Categories
Code

Step 4: Exception handling and Raising new custom Exceptions

In our last chapter on “WET code, DRY code, and Refactoring the low-level REST Adapter”, we refactored our code into a basic, yet reasonable low-level REST API adapter.

In this chapter, we’re going to cover proper Exception handling as well as creating our own custom Exceptions. Let’s start by looking back at our code, specifically our _do method.

Categories
Code

Step 3: Understanding WET code, DRY code, and Refactoring the low-level REST Adapter

This chapter is a bit of a side-bar conversation, but it’s an important one. If you’re still fairly new to programming, it’s time we introduce the concept of WET and DRY code as well as knowing when to take the time to refactor (clean-up) your code.

In the previous chapter, we wrote a simple low-level REST API Adapter. We hadn’t even passed 30 lines of code when it started to become apparent that our code was getting sloppy.

Categories
Code

Step 2: Write a low-level REST adapter

In this tutorial, we’ll be using the PyCharm IDE Community edition.

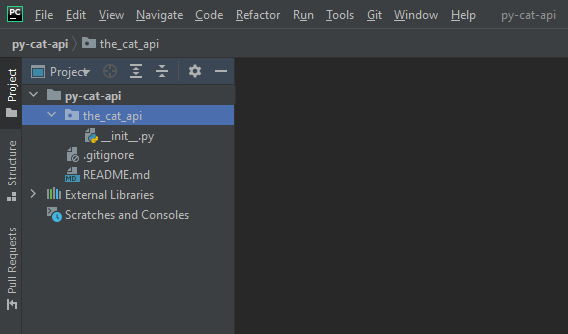
Let’s get started by selecting Create New Project. As shown here, I called the project, py-cat-api. Right-click on “py-cat-api ” folder in the Project navigation panel and click New => Python Package. You can name the package similar to what you named your project. In this case, the_cat_api.

PyCharm IDE in Windows 10

There should now be a subfolder in your project folder with a single empty file named __init__.py — This indicates to Python that this folder is a Python Package. (You could have just manually created a subfolder and manually added that same file, but this feature in the IDE saves you a step.)

So why did we create a folder with a subfolder of a similar name? Well, we’re setting up for creating a Git repository (the first folder) and putting a Python Package inside it (the second folder). If you’re familiar with Git, you know what to do. If not, don’t worry, we’ll get to this later.

Problem Scope

To understand what we’re about to do, it’s important to step back for a minute and understand the scope of the problem.

  • What we have is a JSON REST API (TheCatAPI)
  • What we want to do is create a uniform way of connecting to that API in Python.

The Python library we’re going to use to enable us to reach this service is known as requests.

Categories
Code

Step 1: Read the Docs and use PostMan to understand the REST API

This is the 1st chapter in a multi-part series called “How to write a Python3 SDK library module for a JSON REST API in 15 simple steps

Before going into battle, it’s important to do some reconnaissance. With any REST API, it’s important to get a feel for how the REST API behaves. Some REST APIs are written by professionals and are very easy to work with. And well, others are written by amateurs and are down-right terrible and inconsistent. Understanding how the API behaves before writing any code is the foundation for whether your wrapper library will be any good or not.

In this chapter, we’re going to cover:

  • Installing Postman
  • How we decided on an API
  • Understanding the Documentation
  • Authentication (Credentials, Tokens, Cookies, etc.)
  • API versions
  • Paths and Endpoints
  • Data returned (JSON)
Categories
Code

Python JSON REST API wrapper library: a How-To in 15 simple steps

REST APIs. They’re all over the web. You could directly code against them in Python, but after a while, you start repeating yourself and your code becomes crufty and difficult to maintain. Your “high-level” business logic becomes intertwined with the “low-level” nitty-gritty logic of parsing I/O. And that’s bad news.

The smart solution is to abstract away the REST API with a “wrapper” library module more commonly known as a Software Developer Kit (SDK). Take all that nitty-gritty detail and push it down to where you don’t need to worry about it anymore and then just import your Python module and code directly against it.

If you’re using an intelligent IDE like PyCharm or VS Code, then you can leverage Type Hinting for auto-code completion. Keep your business logic separate from the boring details and your code is faster to develop and easier to maintain. Here’s how to do it:

Categories
Storage

The Best external HDD for the Wii U is a High Endurance 256GB MicroSD card!

Back in May of 2015, the Wii U was still a thing. It was an amazing thing. But the Switch has come along and stolen all the glory.

Sure, the Switch is a lot of fun, but the Wii U is a solid low-cost Switch-like experience that’s worthy of exploring. But many are wondering how to store data on it.

black-n-white-wii-u

In 2015, I lamented the fact that Nintendo missed an opportunity. The black and white versions only shipped with 32 and 8GB of flash storage, respectively. Most gamers would want to download all their games and after a few games, quickly run out of space.

Categories
Main Storage

Kaby Lake (and Skylake) building tips: Enable XMP and Install NVMe drivers

A few days ago, all the parts arrived for a brand-new Kaby Lake Core i7-7700K build. Soon enough, a shiny black PC stood before me, assembled, and beckoned me to turn it on. And turn it on, I did. After marveling at how fast it booted, the first order of business was benchmarking!

There are a lot of benchmarks to run out there, but the one that I find fascinating is the program you can download from http://cpu.userbenchmark.com — The website takes data from each person who runs the benchmark and then loads the results into a giant database from which you, the user, can then compare your results against, including parts and processors that you don’t own.

When the benchmark program was run on the new Core i7, many scores came out on top, but a few were marked “performing worse than expected”. Fortunately, there were some easy fixes.

Categories
Analog Power

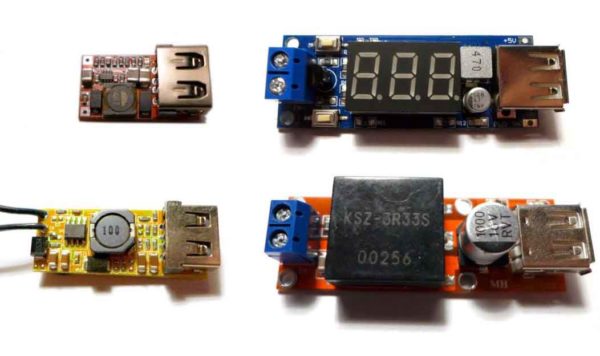
A review of four Switch-mode Buck (Step-down) converters with USB ports

While designing a project that required 5v USB power ports from a much higher voltage source (eg. 12v or 24v), it occurred to me that there are circuits already designed to do this. In fact, not only do they exist as low-cost, easy-to-purchase modules, but some of them already have the USB port soldered onto the board.

4-step-down-buck-usb-converters

Four Step-down converters with USB ports were picked out and reviewed in an attempt to find “the best cheap USB switch-mode step-down converter” for 12v power supplies.