Categories
Storage

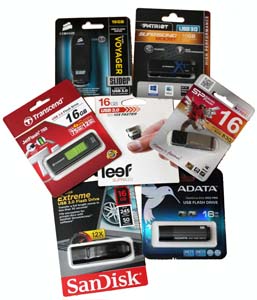
The best 16GB USB 3.0 Flash drives for under $20

USB 3.0 Flash Drive assortmentWhether you call it a jump drive, thumb drive, key drive, zip drive, or that thinga-ma-jig, the USB flash drive is an amazing piece of technology. Oh sure, there’s “the cloud” where you can store all your data on some server controlled by “the man”, but there’s nothing like having your data right in the palm of your hand on a nice little chunk of nearly indestructable Flash memory. (okay, seriously, don’t take a hammer to it. That will end badly.) But wow, have flash drives grown!

Originally, they were just a handful of megabytes restricted to a slow USB 1.1 interface. Now they’re all grown-up; 8, 16, and even 32 Gigabytes are common! And now they’re on the fancy, new USB 3.0 with its 5 Gigabits per second interface. (That’s a scorchingly fast 625 MB/s!)

Now that the future has arrived and USB 3.0 is found on all new computers, laptops, and tablets, what is the best flash drive to buy? Well, that’s a tricky question. Most people do not have a lot of money to throw around so this article is focused on keeping the cost under $20. And to keep things even, let us also look at only 16GB drives — A common size in this day and age. Which invites the question:

What’s the best 16GB USB 3.0 flash drive for under $20?

Categories
Storage

How to replace the DVD drive in your Nintendo Wii

If you have had your Nintendo Wii for a while now, there is a good chance that it has just stopped reading discs or is having great difficulty or has gotten very noisy. Sometimes a laser lens cleaner disc will fix it, but often times it doesn’t. You *could* send it back to Nintendo, but they’ll charge you an arm and a leg to fix it.

Fortunately, you can replace the drive yourself for ~$35. It’s not hard to repair a Wii. If you can handle a screw driver and are gentle with things, you should have no problem replacing the drive.

Categories
Networking

Testing my Netflix Network speeds

The Netflix NThe news has been abuzz lately with net neutrality issues and realizations that companies like Verizon and Comcast are secretly, but intentionally throttling services like YouTube and Netflix. So how does the average home user check their Netflix network speeds and potentially speed them up if they are too slow? Here are a few things that I tried. The results were not quite what I expected.

Categories
Storage

All the LightScribe templates!

share-all-the-things
Image: hyperboleandahalf

The LightScribe Template Labeler comes with a handful of default templates, but it turns out there are a lot more out there. They used to be hosted on the LightScribe website, but it seems that HP has grown tired of hosting this site, so they took everything down. Here are 43 extra template packs:

Categories
Networking

Resetting two Cisco Catalyst 2950 switches to factory defaults

In my last post on the Cisco CCNA, it was mentioned that an order for two used Cisco Catalyst 2950 switches had been placed. Well, the two switches arrived a few days later. So I plugged them in, but that was all I could do because there were no Console cables (aka. Rollover cables) to be found in the box. Granted, I wasn’t really expecting any since the seller had not mentioned any, but to connect to a switch that I knew nothing about, the smart bet was to connect via the RJ-45 jack (which is actually a 9600 bps serial port.)

If you already know how to physically connect to your 2950 switch, click here to jump to the Catalyst 2950 password recovery procedure.

If you don’t have the appropriate tools yet, this means that 3 things will be needed to get started: a Rollover Cable, a USB-to-Serial adapter, and some Terminal software. This is what I picked:

Categories
Storage

How to use the LightScribe feature on your CD/DVD burner

LightScribe. That fancy feature on your lightscribeCD/DVD burner that writes a monochrome image onto the label side of your CD-R or DVD+R, yet somehow you know nothing about it nor how to use it. How does it work? Good question.

Categories
Networking

Cisco CCNA ICND1 100-101 Prep — Getting started

Computer networking is something that I’ve always been involved with for most of my career, but it has only been a part of it. Rather, it has never been the focus of my career. Recently, I’ve decided that I want to move away from pure software development and back into IT with the focus being Networking. In this day and age, one cannot really get a job without the requisite certifications to demonstrate basic competence in said field. In short, I decided to go for my Cisco Certified Network Associates (CCNA) certification in Switching and Routing.

Categories
Main

Exploring the Netduino #4: Make LEDs *really* Glow (or: Fun with PWM)

In our last entry, “Exploring the Netduino #3: Building the circuit on a Breadboard“, we covered the step-by-step method to wire up the proposed schematic for switching an LED on and off via a power MOSFET. In this entry, we are going to get to the fun stuff: CODE!

But first, a little bit on LEDs

Light Emitting Diodes (LEDs) may function a lot like (incandescent) lightbulbs, but they should never be treated like them. Like lightbulbs, LEDs can be dimmed by controlling the forward voltage. Unlike light bulbs, this range tends to be rather narrow and as such is somewhat difficult to control. Fortunately, dimming LEDs can happen another way that is particularly easy to do with a digital circuit: Pulse Width Modulation (PWM).

Categories
Main

Exploring the Netduino #3: Building the Circuit on a Breadboard

In “Exploring the Netduino #2: (Indirectly) Driving an LED“, we covered the electronic theory of how to use a Power MOSFET to turn the LED On and Off via a digital signal. In this post, we are going to walk the reader step-by-step on how to wire-up the circuit on a breadboard. If you’re using an Arduino, the steps are exactly the same.

As mentioned previously, you will need the following equipment and parts:

  • An electronic breadboard
  • A few common LEDs (like 5mm Red)
  • A couple resistors (a 1 MOhm and a 68 or 100 ohm)
  • N-Channel MOSFET (like RFP30N06LE)
  • A 3.3v power supply or a 2-cell AA Alkaline battery pack (3v)
  • Some jumper wires to connect the circuit together
  • Multi-meter (optional)
  • And a Netduino or Arduino, of course!
Categories
Main

Exploring the Netduino #2: (Indirectly) Driving an LED

In “Exploring the Netduino #1“, you may recall that it was suggested that the reader take a look at the Netduino “Getting Starting” guide found on the Netduino.com site to get a feel for the hardware. The guide walks the user through a “Hello, World” equivalent where the  user ends up getting the blue on-board LED to blink on and off. This tutorial aims to pickup where that guide left off.

Over the next few posts, we will cover how to wire up an LED to control its brightness using the Netduino’s Pulse-Width Modulation (PWM) features and supporting electronic circuitry.