Categories
Code

Step 13: Paging the Endpoints

In the last chapter, we covered how to enhance our endpoints and data models with helper methods. Now that we have a working library, it’s time to introduce the concept of “paging” our endpoints and how this helps your code perform better.

What do we mean by “paging”? Simply that we can retrieve a set of results in a limited amount; a “page” at a time.

Various APIs implement paging a little differently from the next. Most APIs with good documentation will actually have a full description of how their paging behaves. TheCatApi does as well.

Categories
Code

Step 12: Create more Endpoints and Helper Methods

In the last chapter, we implemented a high-level endpoint called get_kitty(), but what if we wanted to get a clowder of kitties? We could call get_kitty() over and over again, but that incurs a lot of overhead and latency. It would be better if we just told the cat server that we wanted 10 kitties all at once instead.

Let’s start by looking at our first high-level endpoint:

Categories
Code

Step 11: Create high-level endpoint abstractions

Over the past 10 chapters, we’ve created a low-level REST API adapter, refactored it, made it DRY, and implemented multiple strong data models. We even implemented inheritance!

Now we’re getting to the real heart of this REST API adapter:

The high-level endpoint abstractions!

But we need to have a side-bar about “code smells” first…

Categories
Code

Step 10: Implement Inheritance with data models

If you’re relatively new to Object Oriented Programming (OOP), you’ve probably learned about a feature known as “inheritance“. It’s a really neat feature, but in practice and in real life… well… it isn’t used as much as you might think. As you may have noticed throughout this tutorial, we haven’t created any inheritance of our own.

A common saying in the software development world is:

Favor Composition over Inheritance

But why do we say that? Well, it usually comes down to flexibility.

Inheritance makes code more rigid… less flexible. But it does provide a kind of “contract” on how things can or will be done. And in certain instances, it can make your code DRY-er. (Remember WET vs DRY? If not, feel free to review Chapter 3…)

Wikipedia has an entry on Composition over Inheritance if you wish to read more about this: https://en.wikipedia.org/wiki/Composition_over_inheritance

Categories
Code

Step 9: Create more complex Data Models

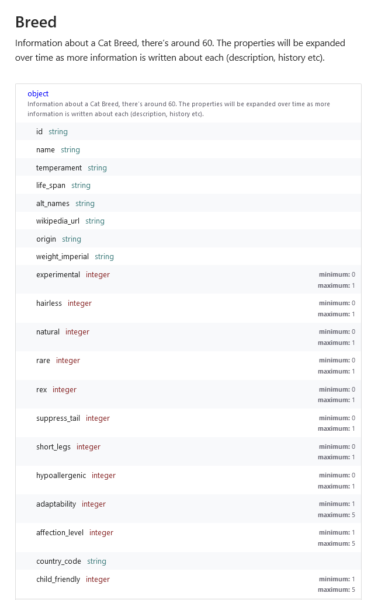
In the last chapter, we covered creating a strongly typed data model Fact class for the “/Fact” endpoint. Now that we have the basics down, let’s try a more advanced data model: Breed

https://docs.thecatapi.com/api-reference/models/breed

Taking one look at this data model, your eyes just start to glaze over, right? Write a strong data model for that?!? You must be crazy!

No, what we’re going to do is leverage a website to write our Python code for us.

Categories
Code

Step 8: Create Strong Data Models

So here we are. We’ve created a REST API adapter! We’ve refactored our code making it DRY, added Exception handling, created a new Result model, added logging and helpful comments. And things were good.

But we can do better… How so?

Well, right now, our REST adapter only really helps us with setup as well as HTTP requests like GETs, POSTs, DELETEs, and any basic error handling. But it doesn’t really help us with the data we get back from TheCatAPI.

Sure, you can manually access all the values in the Lists and Dictionaries if you know the magic strings, but do you really want to memorize all those magic strings? I sure don’t!

How do we solve this? With Strong Data Models, of course!

Categories
Code

Step 7: Add helpful comments to the code

Everyone knows about comments at this point, but did you know that PyCharm can help you write them?

Let’s go to our __init__ constructor and put an empty line between the def line and first line of code:

def __init__(self, hostname: str, api_key: str = '', ver: str = 'v1', ssl_verify: bool = True, logger: logging.Logger = None):

    self._logger = logger or logging.getLogger(__name__)

Now type 3 double-quotes """ and hit the Enter key and PyCharm should auto-create comments like so:

    """

    :param hostname:
    :param api_key:
    :param ver:
    :param ssl_verify:
    :param logger:
    """

Now we can fill them in with useful information, like this:

    """
    Constructor for RestAdapter
    :param hostname: Normally, api.thecatapi.com
    :param api_key: (optional) string used for authentication when POSTing or DELETEing
    :param ver: always v1
    :param ssl_verify: Normally set to True, but if having SSL/TLS cert validation issues, can turn off with False
    :param logger: (optional) If your app has a logger, pass it in here.
    """

Come to think of it, we can tighten up our constructor a little bit by making api.thecatapi.com the default hostname:

def __init__(self, hostname: str = 'api.thecatapi.com', api_key: str = '', ver: str = 'v1', ssl_verify: bool = True, logger: logging.Logger = None):

Lookin’ good. Try doing the same for the _do() method.

What else? The _do() method could use some less formal comments. Comments aren’t just documentation, they can be notes to anyone else who uses your code (or your future self) about what you think you were doing.


That’s right. Comments should NOT necessarily describe WHAT you are doing step-by-step. The code should already be pretty clear about what it is doing.

What comments should describe is:

  • What you THINK you are trying to do
  • WHY you are doing it (if it isn’t abundantly clear why)
  • HOW you are trying to do it (if what you are doing is rather complex)

The reason why it is “what you THINK you are trying to do” is because the lines that you program may NOT actually do what you think you are doing. And you (or a co-worker) may come back later to debug a section of code, and you (or your co-worker) may stare at that section of code and say “well, no wonder this doesn’t work! This code doesn’t do what the comment says it is supposed to be doing.”

And if you didn’t have that comment there, then it’s much harder to figure out what was supposed to be happening.

Similarly, commenting on the reason WHY is also useful. Sometimes you may write code that does a thing and then come back later and wonder why you did it this way. Commenting on WHY can also be important.

Lastly, writing HOW you are doing something can be helpful as well. As was mentioned previously, your code should already be pretty clear as to what it is doing. So no need to explain HOW some section of code works if it is fairly simple. Though if the code is moderately complex, it is still helpful to explain (broadly) HOW you are doing something.


Let’s add a few more comments:

        # Log HTTP params and perform an HTTP request, catching and re-raising any exceptions
        try:
            self._logger.debug(msg=log_line_pre)
            response = requests.request(method=http_method, url=full_url, verify=self._ssl_verify,
                                        headers=headers, params=ep_params, json=data)
        except requests.exceptions.RequestException as e:
            self._logger.error(msg=(str(e)))
            raise TheCatApiException("Request failed") from e

That’s good, let’s try another:

        # Deserialize JSON output to Python object, or return failed Result on exception
        try:
            data_out = response.json()
        except (ValueError, JSONDecodeError) as e:
            self._logger.error(msg=log_line_post.format(False, None, e))
            raise TheCatApiException("Bad JSON in response") from e

And one more:

        # If status_code in 200-299 range, return success Result with data, otherwise raise exception
        is_success = 299 >= response.status_code >= 200     # 200 to 299 is OK
        log_line = log_line_post.format(is_success, response.status_code, response.reason)
        if is_success:
            self._logger.debug(msg=log_line)
            return Result(response.status_code, message=response.reason, data=data_out)
        self._logger.error(msg=log_line)
        raise TheCatApiException(f"{response.status_code}: {response.reason}")

All that’s left is adding formal (""") parameter comments for get(), post(), delete() and the Result __init__() methods. Try it yourself!

Step 8: Creating strong data models.


Source code: https://github.com/PretzelLogix/py-cat-api/tree/07_add_comments
Categories
Code

Step 6: Add Logging

When you first start programming in any language, you’re often taught to print() to the console in order to see the values of variables or just to help you debug.

As a beginner, this is an acceptable technique. As you advance in your programming career, you find out sooner or later, that print()-ing to the console to debug is easy, but comes with a lot of drawbacks. But what else should you do?

Use the debugger and use the Logging module instead.

Python created “PEP-282 — A Logging System” back in February 2002! https://www.python.org/dev/peps/pep-0282/

It was inspired by other logging packages of other languages. Logging is a little bit more complex than print(), but it is much better suited to debugging your program than print().

Categories
Code

Step 5: Creating a new Response model

In our last chapter, we talked about properly catching exceptions and re-raising with a custom exception in our _do method:

def _do(self, http_method: str, endpoint: str, ep_params: Dict = None, data: Dict = None):
    full_url = self.url + endpoint
    headers = {'x-api-key': self._api_key}
    try:
        response = requests.request(method=http_method, url=full_url, verify=self._ssl_verify, 
                                    headers=headers, params=ep_params, json=data)
    except requests.exceptions.RequestException as e:
        raise TheCatApiException("Request failed") from e
    data_out = response.json()
    if response.status_code >= 200 and response.status_code <= 299:     # 200 to 299 is OK
        return data_out
    raise Exception(data_out["message"])

In this chapter, we’re going to refactor our code again to make what _do returns more generic and more useful to any code that consumes it.

Categories
Code

Step 4: Exception handling and Raising new custom Exceptions

In our last chapter on “WET code, DRY code, and Refactoring the low-level REST Adapter”, we refactored our code into a basic, yet reasonable low-level REST API adapter.

In this chapter, we’re going to cover proper Exception handling as well as creating our own custom Exceptions. Let’s start by looking back at our code, specifically our _do method.